To display how easily and convenient to read a dataset from GitHub into Pandas DataFrame and save it in local computer
GitHub is a good source of data, and I usually store my projects and datasets in GitHub. In this article, I display how easily and convenient to read a dataset from GitHub into Pandas DataFrame and save it as a .CSV file in your computer. In this example, it uses the Jupyter note besides Pandas. You can use JupyterLab or any other Python IDE.
From this article, I will start to write a continuous series on data analysis using one real-world dataset, and this series includes at least the following parts:
- Part I: How to Read Dataset from GitHub and Save it using Pandas
- Part II: Convenient Methods to Rename Columns of Dataset with Pandas in Python
- Part III: Different Methods to Access General Information of A Dataset with Python Pandas
- Part IV: Different Methods to Easily Detect Missing Values in Python
- Part V: Different Methods to Impute Missing Values of Datasets with Python Pandas
- Part VI: Different Methods to Quickly Detect Outliers of Datasets with Python Pandas
- Part VII: Different Methods to Treat Outliers of Datasets with Python Pandas
- Part VIII: Convenient Methods to Encode Categorical Variables in Python
1. Install Packages
If you use Anaconda, Pandas and Jupyter notebook/lab have been preinstalled. If you have not installed them, and just use your favorite command-line shell to install them as follows:
pip install notebook
pip install pandas
2. Import required package
Since we use Jupyter notebook, so start the Jupyter notebook and create a Jupyter notebook or open an existing one.
import pandas as pd3. Read data
In this example, let’s read a real-world dataset, Chinese GDP directly from a GitHub repository of mine by using the Pandas pd.read_csv() function because this dataset is a CSV file.
There are a number of pandas commands to read and write other data formats, such as:
pd.read_excel('filename.xlsx',sheet_name='Sheet1', index_col=None, na_values=['NA'])
pd.read_stata('filename.dta')
pd.read_sas('filename.sas7bdat')
pd.read_hdf('filename.h5','df')

...
Note: The above commands have many optional arguments to fine-tune the data import process. More information can be referred to https://pandas.pydata.org/pandas-docs/stable/user_guide/io.html
(1) An error to read the dataset
For the datasets in GitHub repository, We cannot use the direct URL of the dataset, https://github.com/shoukewei/data/blob/main/data-pydm/gdp_china_clean.csv in this example, or it will cause an error.
url ='https://github.com/shoukewei/data/blob/main/data-pydm/gdp_china_clean.csv'
df = pd.read_csv(url)
The error message looks as:
---------------------------------------------------------------------------
ParserError                               Traceback (most recent call last)
~\AppData\Local\Temp\ipykernel_7344\973812801.py in <module>
      1 url ='https://github.com/shoukewei/data/blob/main/data-pydm/gdp_china_clean.csv'
----> 2 df = pd.read_csv(url)

C:\ProgramData\Anaconda3\lib\site-packages\pandas\util\_decorators.py in wrapper(*args, **kwargs)
    309                     stacklevel=stacklevel,
    310                 )
--> 311             return func(*args, **kwargs)
    312
    313         return wrapper

.
.
.
C:\ProgramData\Anaconda3\lib\site-packages\pandas\_libs\parsers.pyx in pandas._libs.parsers.TextReader._tokenize_rows()

C:\ProgramData\Anaconda3\lib\site-packages\pandas\_libs\parsers.pyx in pandas._libs.parsers.raise_parser_error()

ParserError: Error tokenizing data. C error: Expected 1 fields in line 28, saw 367
(2) Correct URL to read the dataset
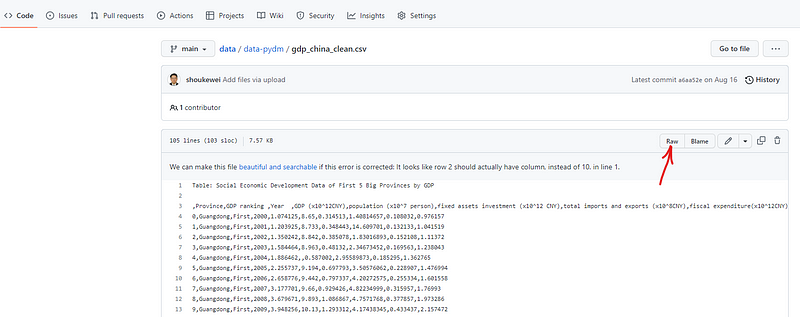
We should use URL of the raw dateset rather than the direct dataset URL. Thus, click the raw menu on dataset page and go to the raw data page.

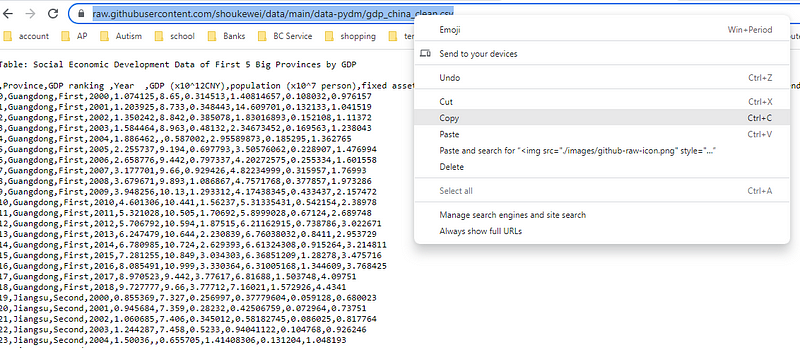
Then copy the URL of that page and use it in the code snippet below.

(2) read the dataset
url ='https://raw.githubusercontent.com/shoukewei/data/main/data-pydm/gdp_china_clean.csv'
df = pd.read_csv(url)
(3) display the first 5 rows
df.head()
The first five rows of the output table show that there is a table caption at the beginning. You can confirm this by go to the online dataset in my GitHub.
(4) display the last ten rows
df.tail(10)
The last five rows of the output table display that there is a source description of the dataset at the end. You can see this clearly by go to the online data table in the GitHub.
4. Skip some lines
However, we only need the dataset for analysis without the caption and source. Thus while reading the dataset, we can skip these text lines, where one caption line and one space line at the beginning and one space line and six lines for source description at the end.
(1) Skip rows from top
If you want to skip some rows from the top, you can use skiprows=Numbers of the rows, say skiprows=2 in our example, in which we also specify the engine as Python.
df = pd.read_csv(url,skiprows=2,engine='python')(2) Skip rows from footer
Similarly, if we skip some rows from the bottom or footer, we can use skipfooter=Numbers of the rows, say skipfooter=7 in our example.
df = pd.read_csv(url,skipfooter =7,engine='python')(3) Skip rows from both top and footer
In our case, we will skip both the first 2 rows and the last 7 rows, so we can do this using the following code.
df = pd.read_csv(url,skiprows=2,skipfooter =7,engine='python')(4) Check the imported dataset
You can check the first and last few rows again to see if the text lines have been removed.
# read the first three rows
df.head(3)
# read the last three rows
df.tail(3)
5. Save the dataset
Lastly, let’s save the dataset in the data folder of working directory in this example. We use index=False to save the data without the index.
df.to_csv('./data/gdp_china_clean.csv', index=False)6. Online course
If you are interested in learning Python data analysis in details, you are welcome to enroll one of my course:
Master Python Data Analysis and Modelling Essentials


