

Anaconda PowerShell Prompt is more handy than Anaconda Prompt
In the previous two articles, it shows how to add Anaconda Prompt on Windows Terminal, and how to add it on the right-click menu. In this article, we will talk about how to add Anaconda PowerShell Prompt on the Windows Terminal. This is the fourth part of the story series, “What Windows Python Developers Had Better Setup Earlier”. The content structure of this series is organized as follows. If you are interested in this series, please follow me.
- Part(I): Windows Terminal
- Part (II): Add Anaconda Prompt on the Windows Terminal
- Part(III): Add Anaconda Prompt on the Right-Click Menu
- Part(IV): Add Anaconda PowerShell Prompt on the Windows Terminal
- Part(V): Add Anaconda PowerShell Prompt on the Right-Click Menu
If you are interested in using Anaconda Prompt rather than PowerShell Prompt, please go to the previous two articles.
1. Anaconda Prompt VS Anaconda PowerShell Prompt
There are two Prompts for Anaconda, one is Anaconda Prompt, which is the classic one; and another one is the Anaconda PowerShell, which was newly added one. As their name suggest, Anaconda Prompt and Anaconda PowerShell Prompt run conda commands under the Windows shell environments of cmd.exe (Command Prompt) and powershell.exe(PowerShell Prompt), respectively. If you are interested in deeply studying these two command-line shells of Windows, please refer to Windows Documentation.
There are no much difference between them if you just run Python related commands, such as Python, IPython, Jupyter, Conda, etc, and Python codes. However, comparatively speaking, Anaconda PowerShell is much handier for developers, who often access the working directory by typing its path. For example, we access my working directory wavelet analysis in the Drive D: on my computer.
For Anaconda Prompt, we run the following command line by line:
$ D:
$ cd mylecture\wavelet_analysis
For Anaconda PowerShell Prompt, we do the same things by the following command:
$ cd D:\mylecture\wavelet_analysis
Let’s see how to add Anaconda PowerShell Prompt on the Windows Terminal in the following section.
2. How to add Anaconda PowerShell on the Windows Terminal
The process is very similar with that of adding Anaconda Prompt on the Windows Terminal.
Step 1: Search Anaconda PowerShell Prompt
- Type
Anaconda PowerShell Prompton the search box of Windows 10 or 11 - Right click to open the location
- Right click
Anaconda PowerShell Prompt - Hit Properties
- Copy the path in
Target

Anaconda PowerShell PromptStep 2: Edit the target
Paste it into any text file editor, such as MS Word, text, and whatever. It is something looks like follows, but where my PC user name is Sigmund which is different from yours:
%windir%\System32\WindowsPowerShell\v1.0\powershell.exe -ExecutionPolicy ByPass -NoExit -Command "& 'C:\Users\Sigmund\anaconda3\shell\condabin\conda-hook.ps1' ; conda activate 'C:\Users\Sigmund\anaconda3' "
Remove the useless information for us and just keep the following:
powershell.exe -ExecutionPolicy ByPass -NoExit -Command & C:\Users\Sigmund\anaconda3\shell\condabin\conda-hook.ps1; conda activate C:\Users\Sigmund\anaconda3
Step 3: Copy Path of Anaconda Navigator Icon
- Type Anaconda navigator on the search box of Windows 10 or 11
- Right click to open the location
- Right click on Anaconda navigator(anaconda3)
- Right click Properties
- Click Change icon
Copy icon path into text editor, it looks as the follows:
%USERPROFILE%\anaconda3\Menu\anaconda-navigator.ico
 Fig. 2. Path of Anaconda Navigator Icon
Step 4: Open the Setting of the Windows Terminal
- Open the Windows Terminal
- Click the down arrow and hit
Setting
 Fig.3. Go to setting of the Windows Terminal
Step 5. Open JSON File of the Windows Terminal
- Go to the last of the left menu
- Hit
Open JSON File
 Fig.4. Open JSON File of Windows Termina
Step 6. Copy cmd.exe code snippet and modify it
Copy cmd.exe code snippet, which is easy to edit and something looks like the following:
{
      "commandline": "cmd.exe",
      "guid": "{0caa0dad-35be-5f56-a8ff-afceeeaa6101}",
      "hidden": false,
      "name": "Command Prompt"
    },
But it maybe looks a bit of difference on Windows 10 and 11.
- Past it next line after it
- Then change “commandline:” part to the edited Target of Anaconda PowerShell Prompt above. It looks something like follows:
"commandline": "powershell.exe -ExecutionPolicy ByPass -NoExit -Command & C:\\Users\\yourusername\\anaconda3\\shell\\condabin\\conda-hook.ps1;conda activate C:\\Users\\yourusername\\anaconda3",Step 7. Add “icon:” line
You can add "icon:" line after any other lines, say after “hidden”: line here for example.
"hidden": false,
"icon": "%USERPROFILE%\\Anaconda3\\Menu\\anaconda-navigator.ico",
Step 8. Modify the “guid” line number
Change the “guid’ number to make unique from others, we can just change the last few numbers, say6101 in my computer to 5687, or whatever you like.
"guid": "{0caa0dad-35be-5f56-a8ff-afceeeaa5687}",Step 9. Change the “name” line
Change “Command Prompt” on the “name” line into “Anaconda PowerShell”, which is as follows:
"name": "Anaconda PowerShell"If it is not the last line, please add the comma “,” at the end line.
The finally modified version looks like the following screenshot:
 Fig.5. The final modified version
Step 10. Save the file
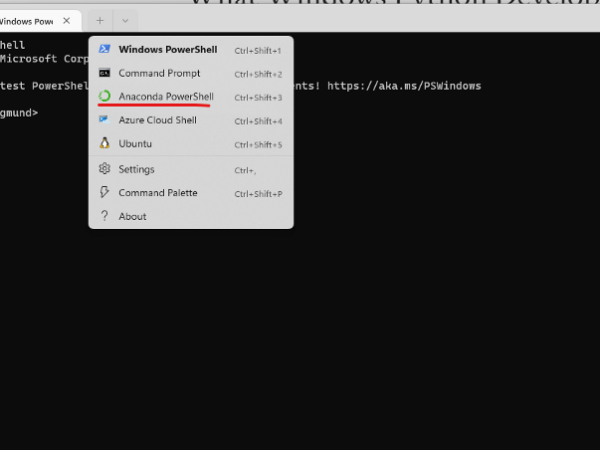
Go to file and then click save to save the edited JSON file. When you reopen the Windows Terminal, you will see the Anaconda Prompt with its navigator icon on the menu of the Windows Terminal, which looks like the title image at the very beginning.
3. Video Version
If you like to watch a video version of this article, please go ahead to watch it and click to subscribe for more tips.
More Information:
If you are interested in Python related courses on Python fundamental, Jupyter Notebook, Data Science, Wavelet Transforms, Machine Learning, and so on, welcome you to the online school — Deepsim Academy.