


Jupyter Notobook is one excellent IDE for Python Developers
From this article, I will introduce some pretty handy features that we should know earlier. If you are interested in learning July notebooks, please follow me, and then you will not miss one of them.
We can create .py files easily in other IDE, such as PyCharm, VS Code, Spyder, only name few. Many people think Jupyter note can only create .ipynb extension files, which is short for Ipython Jupyter Notebook. Actually, there are several ways to create Python (.py) extension files. In this article, I will display four handy ways to create Python (.py) extension files, which can be run directly in other Python IDEs.
1. Use built-in text editor
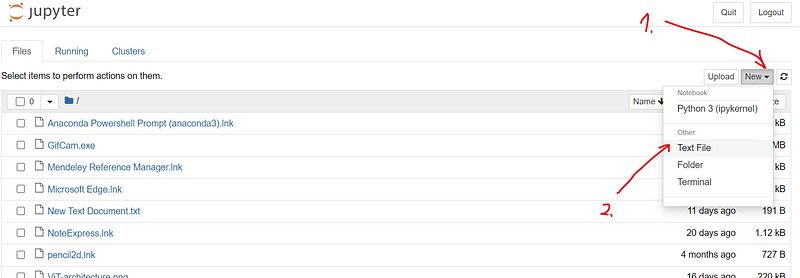
Go to the New drop-down button in the top-right on the Dashboard, and select Text File to open the text editor.
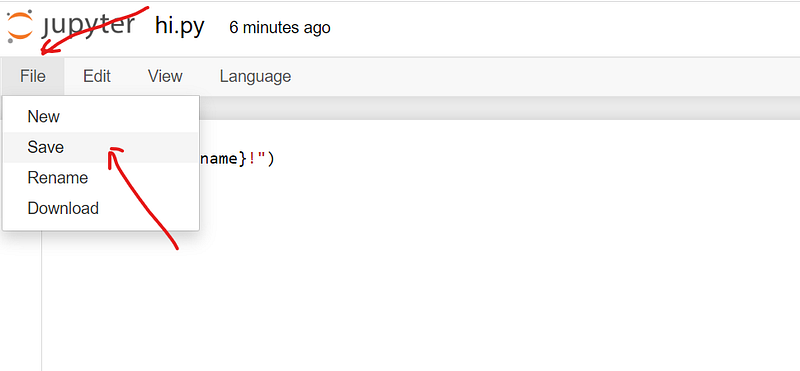
Rename the file to any name with .pyextension first. For example, we rename the file to hi.py. I stress first here because the code will indent automatically only when you change the file name to .pyfile first. Otherwise, you have to indent codes manually.

Then let’s type the following simple python program in the text editor as an example:
def hi(name):
    print(f"Hi,{name}!")
Then let’s go to File menu in the text editor, and select Save and the file will be saved into your working directory.
2. Download as .py
We create a new notebook named as myname, and type the following script:
name = "Tom"
print(f"My name is {name}")
Then go to File, choose Download as, and select Python (.py).

The file was downloaded into your default download folder rather than your working directory.
3. Create .py using magics
(1) %%writefile Magic
- Start Python coding with
%%writefile filename.py. - Create a
hello.pyfile, in the code cell in Jupyter notebook type
%%writefile hello.py
def hello(name):
  print(f"Hello, {name}!")
Then click ‘run’, the outcome is as follows:
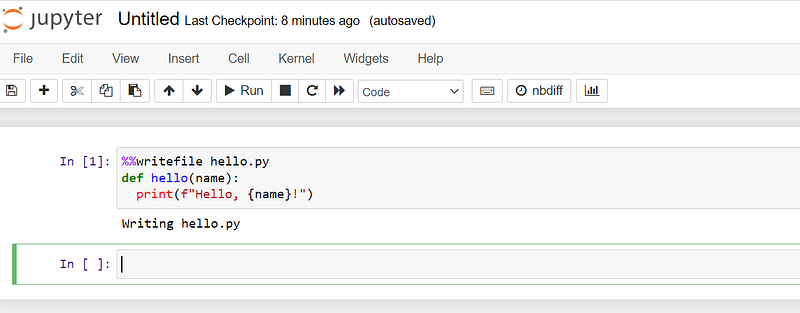
It outputs “writing hello.py”, which means the file was saved into your working directory.
This is the most convenient and flexible way to create .py file. We can transfer any notebook cell with Python code into a Python file by just adding%%writefile filename.py at the beginning of codes.
(2) %%file magic
%%file magic works similarly to %%writefile. Let’s create a “greeting.py” file in Jupyter notebook, for example, and type and run the following code in Jupyter notebook.
%%file greeting.py
def hello(fname,lname):
    print(f"Hello, {fname} {lname}!")
Summary:
This article introduces you 4 convenient methods to create Python (.py) extension files directly in Jupyter notebook app, including using built-in text editor, download Jupyter notebook as .py file, and using %%writefileand %%filemagics.
If you like video, there are two videos about these topics as follows. Please subscribe for more tips by click: https://www.youtube.com/channel/UCQpUJn9GfUjKkFP2X-1pjoQ?sub_confirmation=1
Online Courses
If you are interested in Python related courses on Python fundamental, Jupyter Notebook, Data Science, Wavelet Transforms, Machine Learning, and so on, welcome you to my online school — Deepsim Academy.